Chivalry is Dead – The Terrain
Published by naughtyjester on

The Terrain
Let’s talk terrain. You have to get around the track 1-2 times to win the race after all, and that’s not easy.
Lap Length
Why does the number of laps vary? It depends on how long of a game you want. Most people play with ~8 chariots for one lap so that the game stays under an hour. Move to 12 chariots in the race and you’re about an hour and a half. The second lap goes faster (since many chariots won’t be alive by then) and of course about 20-30 minutes if you have new players.

Terrain Obstacles
At the beginning of the game you would have setup a few obstacles on the map. These can affect your movement as well. The cosmetic ones on the map that haven’t been placed have no effect, they’re just there as markers for where the tokens are allowed to be placed. When you setup the map you place terrain markers in areas to create chokepoints. They’re best to avoid though but if you can’t it’s not the end of the world. There are 2 core types of Terrain Obstacles.
Rocks
Rocks are placed on the rock markers. They can be driven over but your chariot will take damage if you do so it’s best to avoid them.
Water
What is placed on the mud slick areas. When you’re forced to drive over water you roll a die to and subtract that amount from your current turn movement. That can stop you in your tracks, or just slow you down a bit.
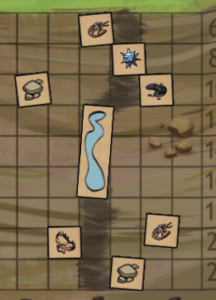
There are also other things that can cause issues. Wrecked Chariots, spike traps, oil slicks, bear traps etc can all hinder your travels. A few well placed traps can really affect the traveling path as soon.
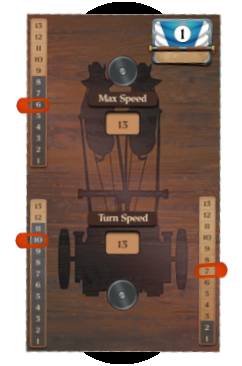
Movement
Ok, so first to around the track you’re going to need movement points. Those are easy. On your chariot you have a Max Speed which is controlled by your race selection and how you upgraded. At the beginning of each turn you’re going to set your turn speed (the bottom dial) to how fast you want to go this turn. The number can go as high as your max speed but there might be reasons you want to go slower.
You use movement points to move around the board and perform actions. When your movement points are done it’s the next person’s turn.
Things that take movement points
· Each square forward takes 1 movement
· In the middle section each square you move sideways takes 1 movement
· On the outside curves moving inwards takes an additional 1 movement (2 total)
· You can never move backwards
· Attacking an opponent takes 1 movement
So, on your turn you have 20 movement points. You could move 20 points forward or mix it up anyway you’d like. Let’s say, move 5 squares forward, attack an opponent, move another 3 squares, attack another opponent, then use your remaining 10 points to get into a better position. After each major action (the first 5 movement spaces for example) it’s recommended you adjust your max turn speed down by the used movement to more easily keep track.
Charging
At the beginning of your turn, you can also choose to have your mount Charge. If you do this, you roll 1d8 and add that value to your current turn movement. You also spend that amount of endurance points. This gives you a bit of a boost, but it does affect your turn movement for turns so be careful. Also, running out of endurance is generally going to be bad.
Moving around Map
The Curves
On the Curves (areas in red) you must be careful about your speed. As you go around these arrows you need to do a turn check. You determine how much control you need for the turn by taking your current turn and subtracting the turn limit value on the board. Then roll a 1d8 and add your driver modifier to that value. If you’re higher great, you make the turn successfully. If not, you take the difference in damage to your outside wheel. Doing that can cause a real possibility of flipping your chariot so be careful. The little gentle curves just before the middle section have no such speed restrictions.
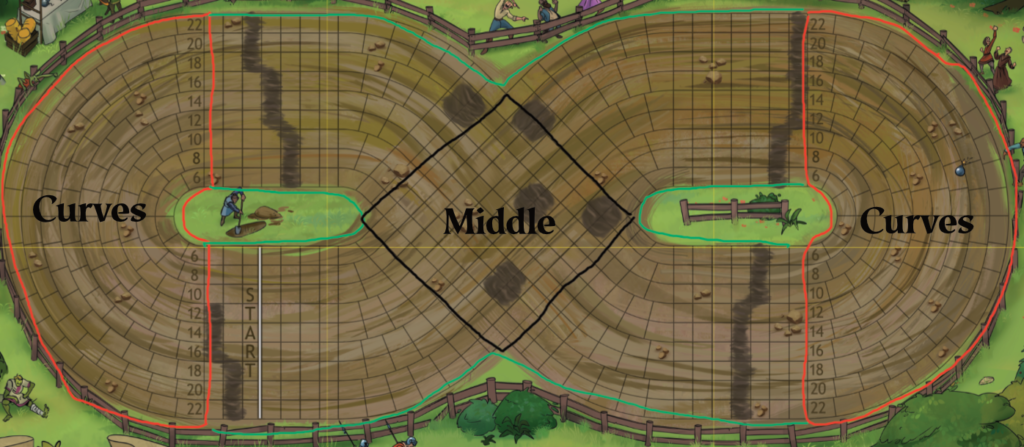
One note that a few of you might have figured out is that if your driver ability is upgrade you can go higher than the turn speed without having a chance of failure. That’s intentional, you can also go quite fast around a turn successfully, you just take a risk of damaging your chariot in the process.
The Middle Section
The middle section of the map is treated like normal except that with a big figure 8 on the map there’s a good chance of a chariot farther ahead or behind sideswiping you. Yup, there are rules for that. It’s also a great place to set traps because the opponents have an extra chance to avoid it.
And that’s how movement works. Lots of things to avoid and a lot of decision to make but each round is different because the terrain changes and players actions (and traps) can adjust it further as the race progresses.
Next Blog we’ll be delving into Combat! Please join our newsletter below for all the latest game news!